
 起点课堂会员权益
学习区块链的最好方法是构建一个(下)

深入理解区块链最好的方式莫过于亲手搭建一个,在这个过程中理解它背后的逻辑和原理。
接上一篇《学习区块链的最好方法是构建一个(上)》
第三步:与我们的区块链交互
你可以使用普通的cURL或Postman工具,通过网络与我们的API进行交互。
启动服务器:
1. $ python blockchain.py
2. * Running on http://127.0.0.1:5000/ (Press CTRL+C to quit)
让我们尝试通过向http://localhost:5000/mine发出GET请求来挖掘一个区块:
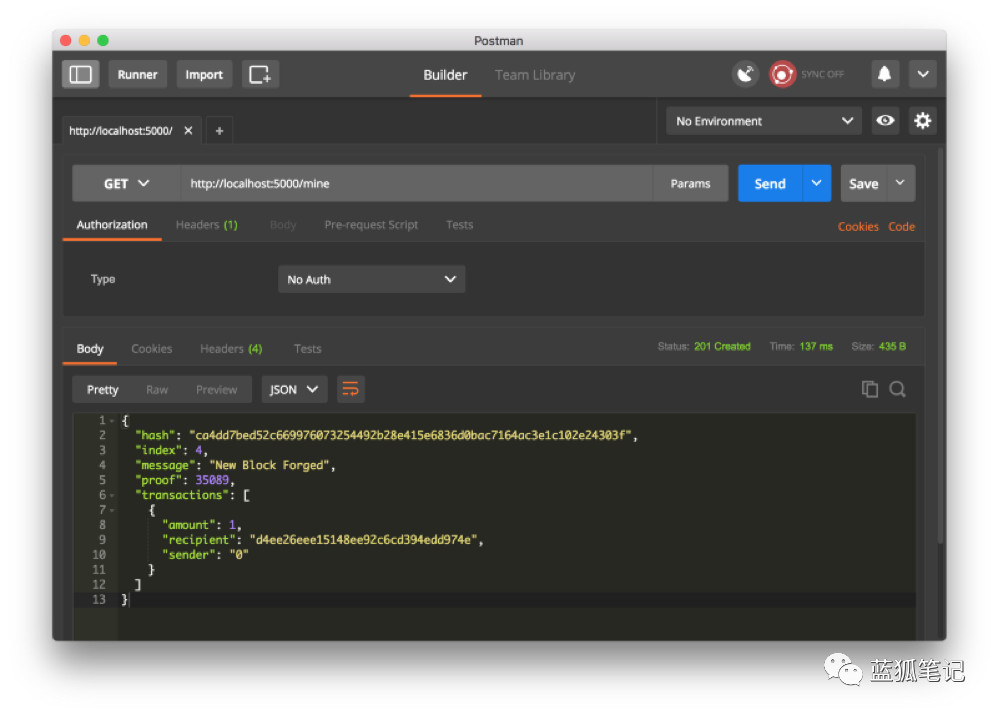
UsingPostman to make a GET request
让我们通过向http://localhost:5000/transactions/new 发出一个POST请求来创建一个新的交易,这个交易包含了交易结构的主体:
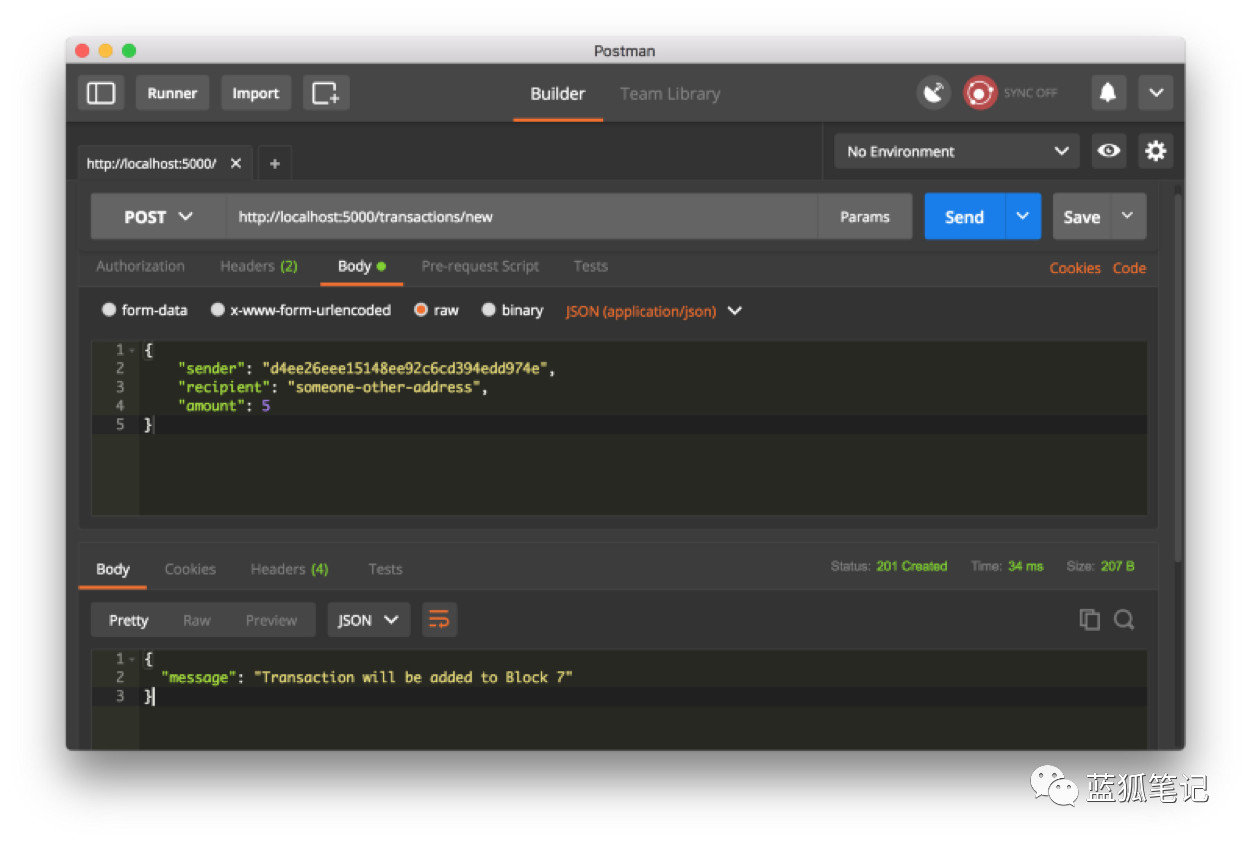
UsingPostman to make a POST request
如果你不使用 Postman 工具,同样可以使用cURL这个工具来实现同样的目的:
1. $ curl -X POST -H “Content-Type: application/json” -d ‘{
2. “sender”: “d4ee26eee15148ee92c6cd394edd974e”,
3. “recipient”: “someone-other-address”,
4. “amount”: 5
5. }’ “http://localhost:5000/transactions/new”
重启了我的服务器,并挖掘了两个区块,总共给出了3个区块。让我们通过请求http://localhost:5000/chain检查整个链:
1. {
2. “chain”: [
3. {
4. “index”: 1,
5. “previous_hash”: 1,
6. “proof”: 100,
7. “timestamp”: 1506280650.770839,
8. “transactions”: []
9. },
10. {
11. “index”: 2,
12. “previous_hash”: “c099bc…bfb7”,
13. “proof”: 35293,
14. “timestamp”: 1506280664.717925,
15. “transactions”: [
16. {
17. “amount”: 1,
18. “recipient”: “8bbcb347e0634905b0cac7955bae152b”,
19. “sender”: “0”
20. }
21. ]
22. },
23. {
24. “index”: 3,
25. “previous_hash”: “eff91a…10f2”,
26. “proof”: 35089,
27. “timestamp”: 1506280666.1086972,
28. “transactions”: [
29. {
30. “amount”: 1,
31. “recipient”: “8bbcb347e0634905b0cac7955bae152b”,
32. “sender”: “0”
33. }
34. ]
35. }
36. ],
37. “length”: 3
38. }
第四步:共识
这非常酷。我们有一个基本的 Blockchain 接受交易,它允许我们挖掘新的区块。但 Blockchain 的关键在于,它们应该是分布式的。如果它们是分布式的,我们如何确保它们都在一条链?这被称为共识的问题,如果我们想要在我们的网络中有多个节点,我们就必须实现一个共识的算法。
注册新节点
在实现共识算法之前,我们需要一种方法让节点知道网络上的相邻节点。我们网络上的每个节点都应该保留网络上其他节点的注册表。因此,我们需要更多的端点:
1. /nodes/register 以url的形式接受新的节点列表。
2. /nodes/resolve 来实现我们的共识算法,它可以解决任何冲突——以确保一个节点拥有正确的链。
我们需要修改 Blockchain 的构造函数,并提供注册节点的方法:
1. …
2. from urllib.parse import urlparse
3. …
4.
5.
6. class Blockchain(object):
7. def __init__(self):
8. …
9. self.nodes = set()
10. …
11.
12. def register_node(self, address):
13. “””
14. Add a new node to the list of nodes
15.
16. :param address: <str> Address of node. Eg. ‘http://192.168.0.5:5000’
17. :return: None
18. “””
19.
20. parsed_url = urlparse(address)
21. self.nodes.add(parsed_url.netloc)
Amethod for adding neighbouring nodes to our Network
使用set()来保存节点列表。这是确保新节点的添加具有幂等性的廉价方式,这意味着无论我们添加多少次特定节点,它都只会出现一次。
实现算法的共识
如前所述,当一个节点与另一个节点具有不同链时就有了冲突。为了解决这个问题,我们制定一条规则:最长的并且有效的链才是权威的。换句话说,网络上最长的链是事实上的链。利用该算法,我们在网络节点之间达成了一致。
1. …
2. import requests
3.
4.
5. class Blockchain(object)
6. …
7.
8. def valid_chain(self, chain):
9. “””
10. Determine if a given blockchain is valid
11.
12. :param chain: <list> A blockchain
13. :return: <bool> True if valid, False if not
14. “””
15.
16. last_block = chain[0]
17. current_index = 1
18.
19. while current_index < len(chain):
20. block = chain[current_index]
21. print(f'{last_block}’)
22. print(f'{block}’)
23. print(“\n———–\n”)
24. # Check that the hash of the block is correct
25. if block[‘previous_hash’] != self.hash(last_block):
26. return False
27.
28. # Check that the Proof of Work is correct
29. if not self.valid_proof(last_block[‘proof’], block[‘proof’]):
30. return False
31.
32. last_block = block
33. current_index += 1
34.
35. return True
36.
37. def resolve_conflicts(self):
38. “””
39. This is our Consensus Algorithm, it resolves conflicts
40. by replacing our chain with the longest one in the network.
41.
42. :return: <bool> True if our chain was replaced, False if not
43. “””
44.
45. neighbours = self.nodes
46. new_chain = None
47.
48. # We’re only looking for chains longer than ours
49. max_length = len(self.chain)
50.
51. # Grab and verify the chains from all the nodes in our network
52. for node in neighbours:
53. response = requests.get(f’http://{node}/chain’)
54.
55. if response.status_code == 200:
56. length = response.json()[‘length’]
57. chain = response.json()[‘chain’]
58.
59. # Check if the length is longer and the chain is valid
60. if length > max_length and self.valid_chain(chain):
61. max_length = length
62. new_chain = chain
63.
64. # Replace our chain if we discovered a new, valid chain longer than ours
65. if new_chain:
66. self.chain = new_chain
67. return True
68.
69. return False
第一个方法valid_chain() 负责检查链是否有效,通过循环遍历每个区块并验证哈希和证明。
resolve_conflicts() 是这么一个方法:它遍历我们所有的邻近节点,下载它们的链并使用上面的方法验证它们。如果一个有效的链被发现,它的长度大于我们的,我们就替换掉我们当前所使用的链。
让我们将两个端点注册到API中,一个用于添加相邻节点,另一个用于解决冲突:
1. @app.route(‘/nodes/register’, methods=[‘POST’])
2. def register_nodes():
3. values = request.get_json()
4.
5. nodes = values.get(‘nodes’)
6. if nodes is None:
7. return “Error: Please supply a valid list of nodes”, 400
8.
9. for node in nodes:
10. blockchain.register_node(node)
11.
12. response = {
13. ‘message’: ‘New nodes have been added’,
14. ‘total_nodes’: list(blockchain.nodes),
15. }
16. return jsonify(response), 201
17.
18.
19. @app.route(‘/nodes/resolve’, methods=[‘GET’])
20. def consensus():
21. replaced = blockchain.resolve_conflicts()
22.
23. if replaced:
24. response = {
25. ‘message’: ‘Our chain was replaced’,
26. ‘new_chain’: blockchain.chain
27. }
28. else:
29. response = {
30. ‘message’: ‘Our chain is authoritative’,
31. ‘chain’: blockchain.chain
32. }
33.
34. return jsonify(response), 200
此时,你可以使用不同的机器,并在网络上创建不同的节点。或者在同一台机器上使用不同的端口来启动进程。我在我的机器上的另一个端口上启动了另一个节点,并将它注册到我当前的节点上。因此,我有两个节点: http://localhost:5000 和 http://localhost:5001 。
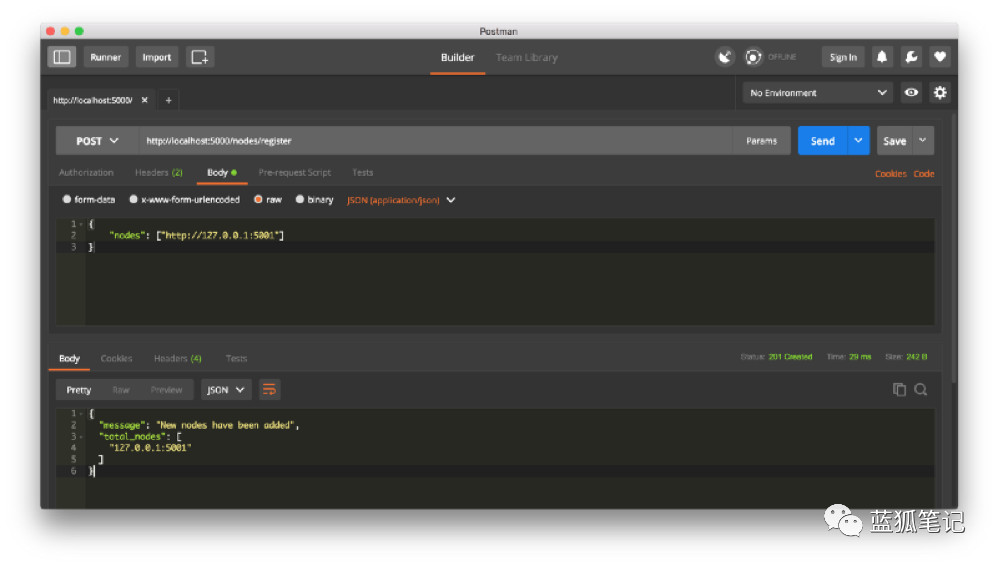
Registeringa new Node
然后我在节点2上挖掘了一些新的区块,以确保链更长。之后,我在节点1上调用 GET /nodes/resolve ,在节点1上的链被共识算法所取代:
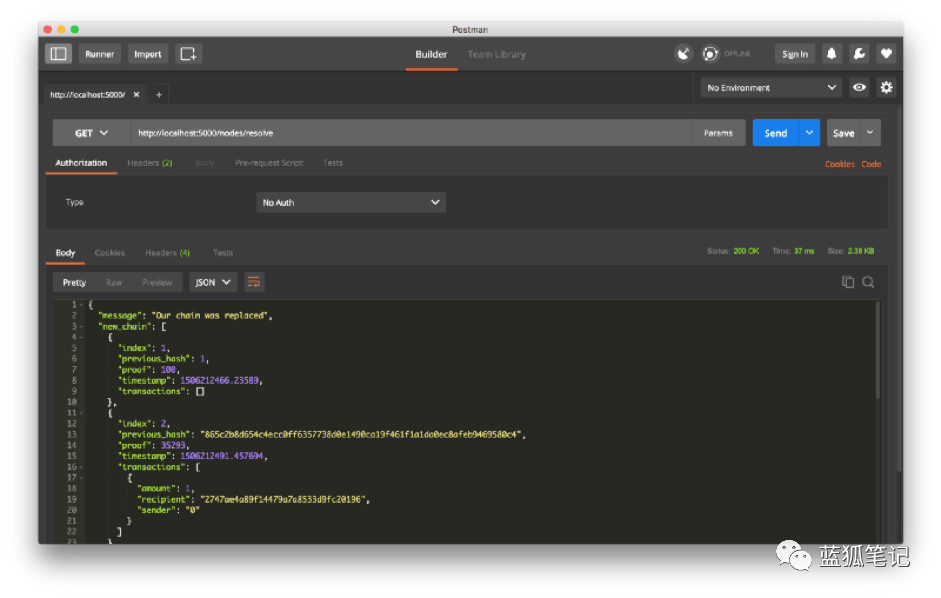
ConsensusAlgorithm at Work
去找几个朋友测试一下你的Blockchain吧。
我希望这能激励你去创造一些新的东西。我对加密货币感到兴奋,因为我相信区块链会迅速改变我们对经济、政府和记录保存的看法。
风险警示:蓝狐所有文章都不构成投资推荐,投资有风险,建议对项目进行深入考察,慎重做好自己的投资决策。
相关阅读
原文作者:Danielvan Flymen
原文地址:hackernoon.com
译者:由蓝狐笔记社群“iGreenMind”翻译
本文由 @蓝狐笔记社群“iGreenMind” 翻译发布于人人都是产品经理。未经许可,禁止转载。
题图来自 Pexels,基于 CC0 协议


很不错,我一个开发的看了都觉得蛮清楚的